Wednesday, July 18, 2012

Roasted Corn on the Cob with Jalapeno Butter

You are probably asking yourself is there anything this girl doesn't use jalapenos in? And the answer is I put them wherever they fit in! What can I say? They grow in my garden so I always have them on hand, fo' free! And I love them. This recipe is a ode to a corn that I have had out except not really that similar. They deep fried it and it didn't have jalapenos. But it's a similar idea...in theory. Fresh, sweet corn on the cob is a summer essential! It's also crazy cheap! It doesn't need much work either. All you need it melting butter dripping off your chin as you bite in and you are in heaven! Such a great summer cook out side dish. You can also grill it (minus the husk) and get a nice char on the corn. Either way it's fabulous! Enjoy!

Ingredients
3-4 fresh ears of corn on the cob (husk and silk intact) Note: I only made 1 cob but there was plenty of extra butter
1/2 stick butter
1 jalapeno
1/2 tsp. garlic powder
1 tbsp. fresh lemon juice (or lime but I only had lemon)
Salt & Pepper to taste

Optional: parmesan cheese, cilantro or parsley

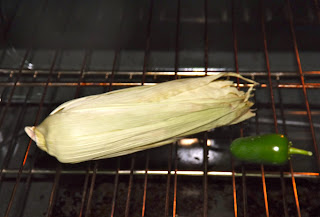
Preheat the oven to 350 degrees. No boiling water necessary, yay!! Assemble your ingredients like this...


Place the corn and jalapeno directly on the oven rack and bake for 30 minutes or until soft. The husk will keep the corn from drying out and burning.


While the corn is roasting allow the butter to soften at room temperature. No picture necessary. 

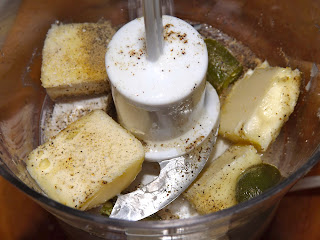
Once the jalapeno and corn are softened remove from oven. The jalapeno finished a few minutes before the corn but it depends on size. In a food processor (or bowl), blend together softened butter, diced jalapeno, lemon juice, salt, pepper, and garlic powder until smooth.

Start to...

Finish!
The husk on the corn will be slightly brown and firm. 


Peel the husk and silk back from the cob. The husk and silk will peel right away from the corn.


Coat the corn with the jalapeno butter and sprinkle with parmesan cheese and cilantro (optional). 


This side dish goes well with almost anything! Seafood, chicken, steak, it compliments it all! Don't forget the coleslaw (my fav!) for the perfect summer plate.


Monday, July 16, 2012

Crab Bruschetta

Crab, crab, I love crab! I used to HATE tomatoes, totally hate, pick them out of everything. I used to hate most things actually. What happened!! Now I'm the bottomless pit. I got obsessed with bruschetta last year and was eating it a few times a week (so unnecessary, really). The addition of crab meat steps up this effortless appetizer. When I make standard bruschetta I use fresh mozzarella but for this recipe I think it takes away from the flavors. Then there's the whole Food Network no seafood and cheese rule, which I clearly don't abide by. I have had this appetizer at a few restaurants around town and it never fails me. You will be the star of the party if you serve or bring this app. Or make your special someone feel fancy with a cozy night in and a bottle of wine. They will love it and you will too!

Ingredients
1/2 of a baguette, sliced into crostini
1 tomato, seeded and diced
1 garlic clove
1 tbsp. fresh chopped basil
1-2 tbsp. Olive oil
2-3 tbsp. Balsamic Vinegar
Fresh Lump or Backfin Crab Meat (I use about 1 tbsp. per crostini
Salt and Pepper to taste

Preheat the broiler to the highest setting, mine is 500 degrees. Slice the baguette into crostini, about 1/2 inch thick. Place the crostini onto a foiled lined baking sheet and drizzle with olive oil. Bake for 1-2 minutes or until golden brown. Don't walk away!

While the crostini are broiling seed and dice the tomato.


Place the diced tomato in a bowl and cover with balsamic vinegar, salt and pepper.


This is my go-to for tomatoes!!
Flip the crostini and broil for another 1-2 minutes. When the crostini comes out of the oven and is still hot, rub with the peeled garlic clove. 

Please ignore my raggedy nails. 
Top the garlicky crostini with 1 tbsp. of crab meat each (or as much as you want). I like a lot! 


Spoon the balsamic tomatoes over the crab and garnish with fresh chopped basil. 

Nom nom nom!!!
I suggest you shovel this as fast as possible to avoid sharing! Pair with a fresh, crisp Sauvignon Blanc (is there anything better??) and you have yourself a perfect, light and fancy appetizer. You know you want a bite...


Sunday, July 8, 2012

Crab Quesadilla

Go make yourself a dang quesadilla!! I am apologizing in advance for the crab extravaganza that is about to happen on the blog but it was on sale this week and who doesn't love crab! I will try to space out the recipes to not overload you. Quesadillas are just about the easiest thing to make so this isn't really a recipe, just a throw together using more or less of what you like. Back in my waiting tables days we had this on the menu and I used to eat it a lot after (or during) my shifts. I think they may have used crab dip as the filler though instead of just the meat. You really need to use REAL crab meat, not "krab". It's just not the same and it's very noticeable when there are only a few ingredients. Since I haven't been able to steam and pick any crabs yet this summer this will hold over my craving, with a lot less work. Don't forget the Old Bay!!!

Ingredients
1 whole wheat tortilla (for a larger quesadilla use 2)
Pepperjack cheese
Cheddar cheese
1-2 serrano peppers, seeded and chopped (or use a jalapeno)
1/4 tomato, seeded and diced
1/4 cup crab meat (I used a mixture of backfin and lump because that's what was on sale. Lump is the very best of the best but use what works for your budget. I also use a hefty amount so adjust as you see fit.)
1 tbsp. Old Bay seasoning

Heat a grill pan over medium heat. You could also use a skillet or the oven. Start by topping half the tortilla with a layer of pepperjack cheese and cheddar cheese. Top with peppers and tomatoes.


Add a layer of crab to cover the cheese. There's never enough crab. Be sure to check the crab for pieces of shell.


Sprinkle liberally with Old Bay seasoning.


Add some extra cheese and peppers to the other side of the tortilla. This will help the quesadilla stick together. Coat the grill pan with cooking spray and grill the tortilla for 1-2 minutes per side. 


Turn the heat down and place a layer of foil over the pan to melt the cheese. Once you get nice grill marks and the cheese is melted remove from the heat and sprinkle with MORE Old Bay!!! Serve up with sour cream, guacamole, or salsa. Or all of the above!


I ate this will Skyping with Chin and he was very jealous! He made me hold it up to the camera so he could have a "bite". Love it!

Crunchy, Cheesy Zucchini Bake

One of the first green vegetables I started eating was zucchini. Now I adore it! It's so versatile and inexpensive, I always have it on hand. I usually grill it with balsamic which is delicious in itself but I wanted to do something different. This recipe is a healthier, easier, crunchier version of a traditional squash casserole. It's cheese and crunch, who doesn't like that. I think that Chin (other name for the boy, FYI) might even try this. He ate zucchini for the first 6 months or so of dating and then one day decided he didn't like it. I guess more accurately he never liked it, he was just trying to be nice. Men. I recommend making extra of this. You will eat more than you expect. Especially because it's semi guilt free!!

Ingredients
2 zucchini, sliced into half moons
1/8 cup parmesan cheese
1/4 cup part skim ricotta
1/4 cup mozzarella cheese (extra for topping)
1 clove of garlic, minced
1 tsp. fresh lemon thyme, minced
1 tbsp. fresh basil, minced (extra for garnish)
Salt & Pepper to taste
1/2 tsp. red pepper flake
1/4 cup mozzarella cheese (reserve some for topping)
1/8 cup panko breadcrumbs
Cooking spray

Start by slicing the zucchini into half moons. Chop the thyme, basil and garlic.


In a mixing bowl combine zucchini, herbs, cheeses, garlic, salt, pepper, and red pepper flake.


Preheat the oven to 375 degrees. Add the zucchini mixture to a sprayed casserole dish. 


Top with panko and extra mozzarella cheese. 


Bake for 35-40 minutes then turn the broiler on for 1-2 minutes to create a crust of panko and cheese. Garnish with fresh basil.


I served it up with some delicious barbecue chicken. Classic American dinner!


Adapted from: Kalyn's Kitchen

Sunday, July 1, 2012

Chicken Souvlaki

Holy hiatus! Where have I been? Sick (again, thanks preschool), work, school, life! Time to get back to bloggin! There is so much to catch up on. Man oh man is it hot outside. I don't know if you've heard, ha! I just finished up a super savings shopping trip. I saved $57 and spent $41. Love it!! Anywho...I love this recipe because I get to use ingredients fresh from my garden. My cucumbers are taking over the porch and climbing the railings. They are huge! Tomatoes are popping up everywhere! The dill is a small forest, and sometimes I catch Peyton snacking on it. Souvlaki also reminds me of college. We had this greek place next to the gas station across from my house (Dave's Taverna for my JMU peeps)  and it was open until 2 or 3 in the morning. Typical college kids that we were, shoveling souvlaki and spanakopita in our faces like calories didn't exist. And they took the money from your college ID! I always went for the souvlaki or the cheesesteak. Oh it brings me back!! Life was so easy  back then.  I can't even imagine doing that now! I'd have to spend the entire next day in the gym! The first time I made this recipe I ate it for 4 days straight. It's that good! Of course it has my staple, nonfat greek yogurt. I can't help it if it works in every recipe! This dish is a great beat the heat meal and is even better cold the next day. Super healthy, flavorful, and simple! My favorite things! Ahhh it's good to be back :)

Ingredients
2 boneless, skinless chicken breasts
2 white or whole wheat pitas
Low-fat feta cheese (I got the block rather than crumbled and it's so much better, try it!)
Tomatoes, chopped

Marinade
2 tbsp. nonfat greek yogurt
1 tsp. fresh chopped garlic
1 tsp. dried oregano
2 tsp. red wine vinegar
2 tbsp. olive oil
Juice of 1/2 a lemon
Salt & Pepper to taste
1 tsp. fresh chopped dill

Tzatziki Sauce
5 oz. nonfat greek yogurt (I used to rest of the container after making the marinade)
1 tsp. fresh chopped garlic
1/4 cup diced, seeded cucumber
Juice of 1/2 a lemon
2 tbsp. fresh chopped dill
2 tsp. red wine vinegar
Salt & Pepper

Let me start by bragging about my garden! I can't tell you how much I love picking fresh veggies from right outside my door.


Ok ok...start by mixing the marinade for the chicken. Combine the greek yogurt, garlic, oregano, vinegar, olive oil, lemon, dill, and salt and pepper. Add the chicken, coat on both sides and refrigerate for at least 1 hour. 


While the chicken is marinating combine the ingredients for the tzatziki sauce. Gently mix the yogurt, dill, lemon, garlic, red wine vinegar, cucumber, and salt and pepper. 


Allow the sauce to refrigerate for a few hours to let the flavors come together.


Preheat the oven to 350 degrees. You could also grill the chicken but right now it's way to hot for me to stand over the grill. Or stand outside. Place the chicken on a foil lined (no clean up) baking sheet.


Bake for 25-30 minutes depending on the thickness of your chicken. The yogurt makes the chicken nice and tender. Now time to assemble. 


Soften the pita bread by tossing it in the oven for a minute or microwave for a few seconds. Slice the chicken into thin slices, top with feta cheese, tomatoes, and tzatziki sauce. Roll it up with foil to keep it from dripping all over you.


Opa!! This makes me think of John Stamos in the greek yogurt commercials. Or Full House. I'm pretty weird. 

Adapted from: A Bitchin' Kitchen